

NVIDIA drivers are software that help your OS talk to your NVIDIA graphics card. They act as a bridge. They let your software (games, design apps, etc.) use your NVIDIA GPU’s graphics power.
Think of it like this: your graphics card is a high-performance engine. The driver is the software that lets that engine work with your computer. Drivers provide updates, bug fixes, and performance tweaks. They ensure your NVIDIA graphics card works well with the latest games and apps.
How to Update NVIDIA Drivers
Updating your NVIDIA drivers is vital. It keeps your system fast and compatible with the latest software and hardware. Here’s a step-by-step guide to make the process seamless:
1. Identify your NVIDIA graphics card model. You must know the exact model of your NVIDIA graphics card before updating. You can find this information in the Device Manager under Display Adapters.
2. Download the Latest Drivers: Go to the NVIDIA website. Then, find the Drivers section. Enter your graphics card model and operating system details. Download the latest driver package available.
3. Uninstall Old Drivers (Optional): It’s not always necessary. But, it can prevent conflicts. Use the Device Manager to uninstall the current NVIDIA drivers.
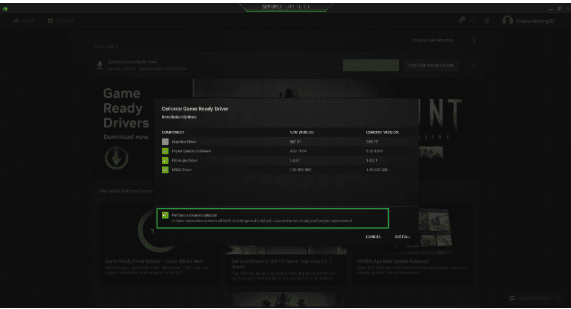
4. Install New Drivers: Run the downloaded driver installer. Follow the on-screen instructions to complete the installation. Choose “Custom Install” to do a clean install. It will remove any remnants of previous drivers.
5. Restart your computer: After installation, restart your computer. This will apply the changes and ensure that the new drivers work.
6. Verify Installation: Open the NVIDIA Control Panel. Check if anyone has installed the new drivers. You can also use third-party software like GPU-Z to verify the driver version.
Update your NVIDIA drivers regularly. You’ll get the latest fixes, boosts, and support for new games and apps.
Also read:Four Loko
How to Uninstall NVIDIA Drivers
Uninstalling NVIDIA drivers is sometimes necessary. Do this to fix graphics issues or before installing new drivers. Here’s a detailed process to help you remove them completely:
1. Access Device Manager: Right-click on the Start menu and select Device Manager. This tool will allow you to manage your hardware and its drivers.
2. Locate NVIDIA Graphics Card: In the Device Manager, expand the Display Adapters section. Right-click on your NVIDIA graphics card and select “Uninstall device.”
3. Remove Associated Software: If available, check to delete the device’s driver software. This ensures that your system removes all related files.
4. Use Control Panel: Open the Control Panel and go to Programs and Features. Uninstall any NVIDIA software, like GeForce Experience or NVIDIA Control Panel.
5. Run DDU (Optional): For a thorough cleanup, you can use Display Driver Uninstaller (DDU). Download and run DDU. Follow the on-screen instructions to remove all drivers from your system.
6. Restart Your Computer: Restart your computer to complete the uninstallation process. Once restarted, your system should no longer have any NVIDIA drivers installed.
Uninstalling these drivers can fix various issues. It is also a must before a clean driver installation.
NVIDIA drivers on Windows 10
Windows 10 is the top OS for gaming and graphics work. So, NVIDIA drivers are essential. Here’s what you need to know:
1. Automatic Updates: Windows 10 often updates NVIDIA drivers, via Windows Update, without user action. While convenient, it can cause compatibility issues with the latest games or software.
2. Manual Updates: For improved control, you can update your NVIDIA drivers yourself. Download the latest drivers from the NVIDIA website. Then, follow the update process described earlier.
3. NVIDIA Control Panel: It comes with your drivers. It has tools to optimize your graphics settings. You can customize your display, manage 3D settings, and configure multiple displays.
4. GeForce Experience: This is a software package offered by NVIDIA. It provides game-ready drivers, auto game optimization, and game recording and streaming.
5. Troubleshooting: If your drivers on Windows 10 have issues, roll back to an earlier version. You can do this in Device Manager. Select your NVIDIA graphics card. Then, under the Driver tab, choose “Roll Back Driver.”
NVIDIA drivers are vital for peak performance on your Windows 10 PC. This is true for gaming, design, and video editing.
Uninstall NVIDIA Drivers
To uninstall NVIDIA drivers, follow these detailed steps that ensure success.
1. Device Manager Method: As noted, Device Manager can uninstall your drivers. Expand the Display Adapters section. Then, right-click your NVIDIA graphics card and select “Uninstall device.”
2. Control Panel Method: Go to Control Panel > Programs and Features. Find all NVIDIA-related software and uninstall it one by one. This includes the graphics driver, GeForce Experience, and other related software.
3. Using Third-Party Tools: Display Driver Uninstaller (DDU) is a powerful tool. It ensures that all NVIDIA driver files are completely removed. Download and run DDU in Safe Mode for the best results.
4. Verify Removal: After uninstalling, restart your computer. Check the Device Manager. The NVIDIA graphics card should not be listed under Display Adapters. Also, confirm that no NVIDIA-related software remains in the Programs and Features list.
5. Reinstall Drivers (Optional): If you uninstalled app to fix a problem, reinstall the latest version. Download the appropriate drivers from the NVIDIA website and follow the installation process.
Uninstalling this app may be necessary for troubleshooting or upgrading to new drivers. This helps keep your system stable and at peak performance.